
Integration with Autopilots

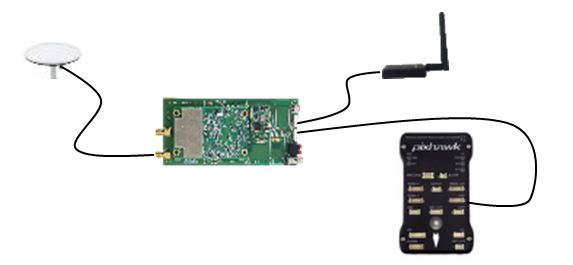
Precis-BX305 board can be integrated with autopilots. In this article, the connecting to Pixhawk flight control is used as an example. A cable is used to connect the COM1 port of Precis-BX305 board and the GPS port of the Pixhawk. It is noticed that the GPS port need a 6pin PicoBlade connector while the COM1 port is a 5pin PicoBlade connector. The pin definition of the Pixhawk GPS port is listed in Table 1. 

With regarding to the power consumption, we recommend using external power sources. Please also pay attention to the baud rate setting of Pixhawk as the default baud rate of Precis-BX305 board is 115200. The Pixhawk can only recognize the NMEA sentence with GP NMEA talker. Incorrect NMEA talker configuration may cause connection failure.

Then you need to mount the GNSS antenna and tether the board on your vehicle. Please beware of following instructions when you mount the GNSS antenna to your drone.
Place the module on the outside of your vehicle (in an elevated position if appropriate) with a clear view of the sky
Distance the module from DC power wiring and the batteries by at least 10cm

Next step is setting up the Pixhawk with mission planner. Open Mission planner software and choose the right COM port on the top right corner. Choose 115200 as baud rate (default baud rate of Precis BX305 COM1 port). Then click ‘connect button’ on the right. Then the Precis-BX305 is recognized by mission planner if the GPS status becomes ‘3D Fix’.


Table 1. Pin definition of Pixhawk GPS port (from left to right)
Pin
Pin1
Pin2
Pin3
Pin4
Pin5
Pin6
Signal
VCC
TX
RX
CAN2 TX
CAN2 RX
GND
Voltage
+5V
+3.3V
+3.3V
+3.3V
+3.3V
GND


Figure 1. Demonstration of Integration with Pixhawk autopilot

If you have further questions, feel free to contact us to info@tersus-gnss.com or visit our official website www.tersus-gnss.com

Tersus Available on Facebook, Twitter, LinkedIn
We have created our Fan Page to keep you updated through the most used social network in the world. Come to "Like" or "Follow" us.

Facebook: https://www.facebook.com/tersusgnss
Twitter: https://twitter.com/wwen0920
LinkedIn: https://www.linkedin.com/company/tersus-gnss


Comments

Popular posts from this blog

Tersus Geomatics Office - Static Surveying - Data Processing

Tersus Geomatics Office is integrated office software to manage and process data for NeoRTK, the RTK survey receiver. It is laid out with visualized toolbars and logical icons to easily handle GNSS data processing, baseline processing and network adjustment, etc. It is the software set to import, update and analyze data effectively.  Watch the video to know how to do data processing after static surveying data collection with NeoRTK.  Learn more, click here .  Inquiry, click here . 

How to Use Oscar to Collect Static Data for A Given Length of Time

Usually, we need to collect static data for a given length of time, for example, 2 hours. In the past, the surveyor had to record the start time and keep an eye on the clock all the time. The function of setting the static collection duration in Oscar GNSS Receiver can solve this problem. When setting the static survey, the surveyor only needs to enter the duration time, then start it, and no more attention will be required. When the time is up, Oscar will automatically stop recording, with no fewer or more data. Now we show you how to set the Oscar static collection duration on the OLED display of Oscar. 1. Turn on the Oscar, press the Power ON/OFF button and Function (FN) button, and go to Mode Config -> Static. The default option of Static is OFF, and you can press the Function (FN) button to switch it to “Auto” or “Manual”. 2. Go to Duration to set the collection time, for example, 120 minutes. 3. Set other options, then choose “Confirm”, and it will start to collect st...

What is CORS network? How to connect to CORS network with external Bluetooth module and mobile phone?

A CORS is a Continuously Operating Reference Station. The CORS is an appealing way to do RTK due to its convenience and large coverage area. While Tersus Precis-BX305 currently does not support build-in NTRIP client feature. An alternative way to connect CORS network is employing external Bluetooth module and a cellphone. Here is a detailed procedure about how to connect to CORS Network with Precis-BX305 board.  Demonstration of connecting Precis BX305 to CORS Network Hardware & Software Requirement Precis-BX305 GNSS antenna GNSS antenna cable  External Bluetooth module Bluetooth cable Cell phone (android system) 5V DC charger Software required Ntrip client (free android apps)    Connect to CORS Network Please follow below steps.  Connect GNSS antenna to Precis-BX305. Connect external Bluetooth module to either COM1 or COM2 of the board Connect to power supplier and plug in/turn on the power Turn on the Bluetooth of the mobil...